How to Teach Phonics: a Step-by-Step Guide for Parents and Teachers

Our simple 6-step guide provides you with essential strategies for teaching the most effective type of phonics.  Includes free resources.

The information in this guide should be helpful for people in a variety of circumstances:

      • Parents who want to learn how to teach phonics at home.
      • Educators teaching phonics to preschoolers.
      • Anyone who wants to provide phonics help for kids in school. 

Disclaimer:  We support the upkeep of this site with advertisements and affiliate links.  We may earn a small commission if you click on the ads or links or make a purchase.  There is no additional cost to you if you choose to do this.

Why Do We Need to Teach Phonics?

There are alternative ways of teaching reading, but numerous studies suggest that phonics is the most effective method for beginning readers.

Extensive independent reviews of reading research in the US, UK, Australia and Canada have concluded that phonics should be a central part of reading instruction.

What is the Right Age to Teach Phonics to Children?

Children In the UK are expected to have a reasonable grasp of phonics by the end of the early years foundation stage when they are 5 years old.  Some people start teaching phonics to children who are much younger than this while others believe it is better to wait until children are around 7 years old. 

We discuss the potential benefits of early reading instruction in more detail in a separate article and we have also written an article covering some of the arguments against early reading instruction.

When to teach phonics depends more on a child’s individual stage of development than their age.  Whatever age they are, it’s helpful for children to have some basic literacy skills before they start phonics instruction.  

This means they should be familiar with books and they should understand that that writing represents spoken words. 

Kids who are ready for reading instruction should be able to turn the pages of books and understand that we start at the front cover and progress to the back cover.  It’s also helpful for them to understand that we read lines of text from left to right (they can pick this up by watching you if you run your finger under the text as you read).

Children should acquire most of these skills naturally if you read to them regularly, but we’ve provided more comprehensive guidance in our article about early literacy skills.

And reading readiness isn’t all about books and print.  Researchers have found a strong relationship between spoken language and early reading skills.  The renowned cognitive scientist Mark Seidenberg has stated,

“We read with our eyes, but the starting point for reading is speech.”

Seidenberg, M. (20017), Language at the Speed of Sight, Basic Books.

Studies suggest that beginning readers have an advantage if they’ve developed good phonological awarenessAnd a decent understanding of spoken English is vital for reading comprehension.  

What is the Best Way to Teach Phonics?

Research suggests that systematic synthetic phonics might be the most effective type of phonics instruction. However, alternative styles of phonics teaching are also beneficial and the skill of individual teachers and the support provided by parents are also important factors in how quickly children make progress. 

What is the Best Order to Teach Phonics?

Studies indicate that it’s most effective to teach children the simplest parts of the alphabetic code first and then gradually introduce them to more complex letter-sound relationships as their knowledge and skills develop.

We’ve outlined a logical and effective sequence of instruction below and we describe each stage in more detail later in this article…

A Step-by-Step Guide to Teaching Phonics: 

Terminology

Academics and some teachers use technical language to describe aspects of phonics instruction. 

In our opinion, it isn’t necessary to use academic terminology when you are teaching beginning readers.  However, we’ve included some of the terms in this article as you are likely to encounter them at some point if you explore other sources of information.  The links we’ve provided will take you to articles where we explain the terms in more detail.

Stage 1: Teach the Common Letter Sounds

Phonics instruction is centred around the relationships between the letters in written words (graphemes) and the individual sounds in spoken words (phonemes).

Consequently, the first step in teaching kids phonics is to introduce them to the simple alphabetic code, so they can learn the most common sound associated with each letter of the alphabet. 

It’s important to avoid any confusion between letter sounds and letter names

For example, think of the sound the letter ‘b’ represents in the words ‘bug’ or ‘bat’; it’s quite different from the letter name, which sounds more like ‘bee’.  Similarly, the letter ‘c’ doesn’t sound like ‘see’ in words like ‘cat’ or ‘cup’. 

We recommend that you avoid using letter names during early phonics instruction.

That’s because knowing the letter names doesn’t actually help when a child is learning to read and using letter names might even have a negative effect on early attempts at spelling. 

See our article, “Should I Teach My Toddler Letter Names?”, for a more detailed discussion of this issue.

Don’t worry if you’ve already taught your child the letter names.  Just tell him or her that each letter has a sound as well as a name and that, “we’re going to just say the sounds now we are learning to read”. 

The following table gives a list of words that contain the common letter sounds.  Don’t try to get your child to read the words yet, they are provided as examples for you so you are clear about the sound to teach your child for each letter…


Letter


Example words that contain the common sound 

a

Ant, apple, hat.

b

Bat, bug, rabbit.

c

Cat, cup, can.

d

Dog, dad, mud.

e

Egg, elephant, ten.

f

Fan, fog, if.

g

Gap, gate, big.

h

Hen, hat, house.

i

It, igloo, tip.

j

Jet, jam, jog.

k

Ken, kit, key.

l

Leg, lamp, doll.

m

Mat, mouse, ham.

n

Net, nurse, fun.

o

On, ostrich, dog.

p

Pig, pencil, tap.

qu

Queen, quack, squid.

r

Rat, robot, carrot.

s

Sun, snake, grass.

t

Tomato, tiger, hat.

u

Umbrella, up, mud.

v

Van, volcano, Kevin.

w

Window, web, wag.

x

Box, six, taxi.

y

Yes, yo-yo, yellow.

z

Zero, zip, buzz.

Points to note:

  • You will notice that we have written ‘qu’ instead of ‘q’. This isn’t a miss-print; it simply recognises that ‘q’ almost always appears in words with a ‘u’ following it.  For this reason, many phonics programmes teach the letter combination ‘qu’, rather than ‘q’ on its own, and we think there’s some sense in doing this, although it’s not essential.  Notice that the two letters together usually represent the sounds of ‘k’ and ‘w’  – ‘kw’.  So ‘Queen’ and ‘quack’ would sound the same if we spelled them incorrectly as ‘Kween’ or ‘kwack’.
  • Similarly, ‘x’ doesn’t really represent an individual sound, it is more like a ‘k’ followed by an ‘s’ – ‘ks’. So if we spelled ‘fox’ incorrectly as ‘foks’ it would sound the same.
  • The ‘x’ sound isn’t normally heard at the start of words even when ‘x’ is the first letter. For example, in xylophone, the ‘x’ is actually pronounced like a ‘z’, and even in x-ray it doesn’t have the ‘ks’ sound, so don’t use these as examples when you are teaching the sound to your child.  Explain to your child that the sound isn’t heard at the start of words.
  • ‘C’ and ‘k’ actually represent the same sound, so when teaching young children to distinguish between the two it is common practice to describe them as curly ‘c’ and kicking ‘k’.
  • You have to be quite careful when pronouncing some of the consonant letters. For example, when pronouncing ‘c’ as in ‘cat’ many people say it as ‘cuh’.  Similarly, ‘t’ is often pronounced as ‘tuh’.  Try not to say the ‘uh’ for these letter sounds because this will make it easier when your child gets to stage 2 where they will be combining letter sounds to make simple words.  If you say the letter sounds ‘c’-‘a’-‘t’ one after the other it is quite easy to pick out the word cat.  But it’s more difficult if you pronounce the letters as ‘cuh’-‘a’-‘tuh’.  The same is true for other letters, so it should be ‘sss’, not ‘suh’, ‘mmm’, not ‘muh’, ‘fff’, not ‘fuh’ etc.  However, it can be very difficult not to say a slight ‘uh’ for some letter sounds like ‘b’, ‘d’, ‘g’ and ‘y’.


    Reading specialist, Tami Reis-Frankfort, demonstrates the precise pronunciation of the letter sounds in the video below.  She also demonstrates the sounds of some ‘digraphs’, which we discuss later in this article.

  • Some programmes introduce a smaller number of letters first and teach children to blend words made up from these letters before learning another set of letters.


    For example, they might introduce the letters: ‘s’, ‘a’, ‘t’, ‘p’, ‘i’ and ‘n’, and teach children to read ‘sat’, ‘sip’, ‘pat’, ‘pin’ etc.   Then move on to teaching say ‘m’, ‘d’ and ‘g’. 

    This is an effective approach that works well with school-age children, but it’s not essential.  Some people teach all of the letters before doing any blending and this might be the easiest approach with younger children.

    There are also different opinions about the best order to teach letter sounds.  You can view some of the common approaches by clicking on the preceding link.

How to Introduce the Letter Sounds

There are two aspects of learning letter sounds:

    • The ability to recall the sounds represented by letters (decoding).  
    • The ability to recall the letters that represent spoken sounds (encoding).

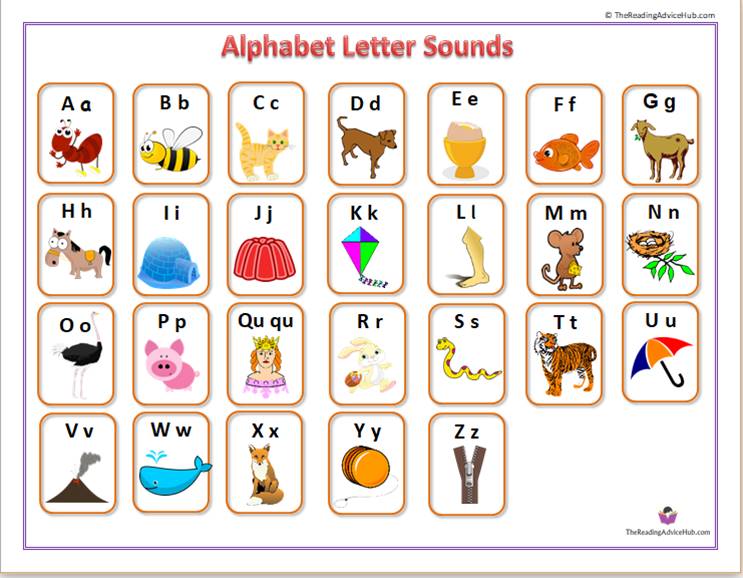
The simplest way to introduce decoding is to show your child a printed alphabet card and then say the letter sound clearly several times.  Get them to repeat the letter sound after you’ve said it 2 or 3 times. 

There are a variety of alphabet cards available online and you can even purchase foam alphabet letters for your child to play with in the bath. 

You can also purchase colourful alphabet books and posters or you could download our free alphabet letter sound sheets and alphabet slide show.

Alphabet Letter sounds sheet landscape

The more you expose your child to the letters and their corresponding sounds the quicker they will pick them up.  However, try not to overwhelm them by showing them all the letters in one go. 

As a guide, many school phonics programmes in the UK recommend introducing around 2 – 5 new letter sounds each week.  You could introduce a new letter sound each day, but remember to also include revision of the sounds taught in previous lessons. 

Copying letters with a pencil and paper is one of the best ways of learning their different shapes because it’s a form of multisensory learning

Unfortunately, very young children can find writing quite difficult.  See our article ‘How to Teach Handwriting  for guidance on how to develop a young child’s writing skills.

If your child isn’t ready to copy letters, they might enjoy colouring them in.  Colouring isn’t as beneficial as writing letters but it can still help your child get familiar with the letter shapes. 

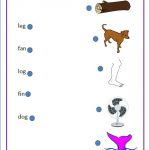
Our free letter-sound worksheets have some letters to colour along with other activities to help your child recognise letters and match them to sounds.  

A-Z Letter sound sheets

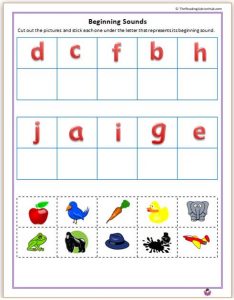
It’s also important to make sure your child can recall the correct letters when you say a sound.

If they are unable to write the letters down, ask them to choose the correct letter from a sample of alphabet cards. 

We’ve produced some free worksheets that you can use for matching the correct letters to sounds.

Match the lettter sound to the picture 1

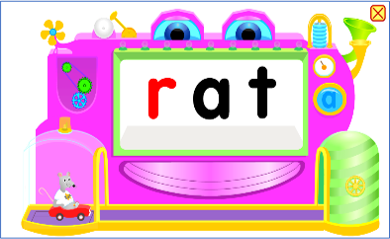
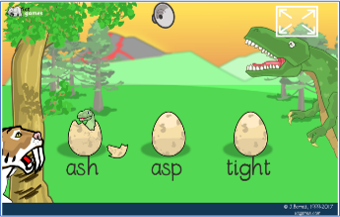
You could also try some of the free online games for letter sounds we’ve complied.

There are also some educational electronic toys that are designed to teach children the alphabet, but most seem to give the letter names instead of the sounds which don’t help with reading as we’ve already mentioned.  If you own any of these it’s probably best to put them away until your child is reading fluently. 

It is possible to find some electronic toys that teach letter sounds; however, electronic toys are not essential for teaching your child phonics.

There are also some commercial DVD’s that introduce letter names in interesting ways and there are some good free videos available on sites such as YouTube. 

Try to choose videos that only give the letter sounds rather than the names like the one below: 

Should I Teach Uppercase and Lowercase Letters?

Some phonics programmes recommend that lowercase letters should be taught first because these appear much more frequently in print.  We think this is a reasonable approach, but the timing of introducing capitals isn’t crucial.

The uppercase letters do need to be learned eventually anyway, so it shouldn’t make much difference in the long run. 

Also, children sometimes ask about uppercase letters when they are looking at books with an adult, and it makes sense to explain the idea to them if they are showing a natural curiosity. 

Another option might be to use a ‘drip-feed’ approach with capital letters.  You could introduce 2 or 3 after your child has mastered the lowercase ones and then introduce a couple of new capital letters each week. 

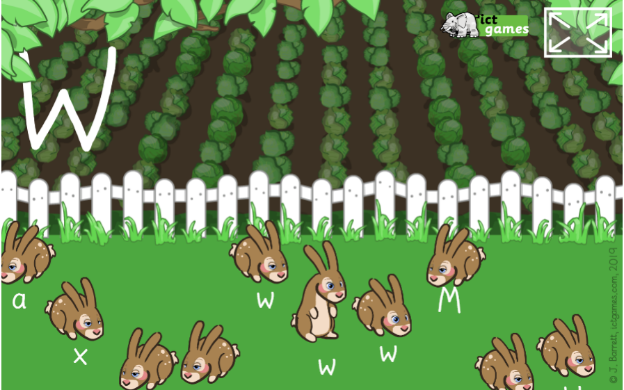
The Big Letter Bunnies game from ict games is a simple but engaging way for children to learn about capitals.  

This free online game involves matching capital and lower-case letters by moving rabbits into a cabbage patch.   Click on the image below to access the game in a new window.

Big Letter Bunnies

How will I know when to move on to the next stage?

It’s important that children can recognise the letter sounds without hesitation before they attempt to read any words that contain these sounds. 

Their response should be instant and automatic.  If your child is struggling to recall the individual sounds they won’t be able to grasp how they merge together to form words. 

To check if they are ready, shuffle some letter cards and hold them up one at a time for your child. 

If they get them all correct, confidently and without having to pause for thought, then they are ready for stage 2. 

If they get some wrong or are slow to recall the sounds of a few of the letters, then make a note of the ones they are struggling with. 

You could still move on to stage 2, but don’t ask them to read any words that contain these sounds until they’ve mastered them. 

Back to the summary of steps…

Stage 2: Blending and Segmenting Simple 2 and 3 Letter Words...

    • Blending involves learning how the sounds represented by letters combine together to form words.  Once a child has grasped the basics of blending, they can read simple words.
    • Segmenting is a related process that helps children spell words. 

Learning to spell and read at the same time using phonics is helpful because the two skills reinforce each other.

Once children have a basic grasp of the skills we describe below, they should be able to read and spell dozens of simple words.

How to Introduce Blending

At this early stage, it’s best to start with words that contain just a vowel and consonant, such as ‘it’ and ‘up’, or 3-letter words with a consonant followed by a vowel then another consonant, such as ‘sit’, ‘cat’, ‘dog’ etc. 

Here are a few more examples:

simple 2 and 3 letter words

You can find lots more suitable words if you follow this link to our free printable CVC word lists.

Some teachers prefer to introduce blending with words that start with continuous sounds and they use a style of blending called smooth or continuous blending

We describe a more traditional approach below that has been used very effectively in schools.  However, you might want to explore continuous blending if you have a child who is struggling.

Whatever style of blending you decide to use, it’s easier if your child has just one word to focus on at a time.  If there are several words on a page, their attention could easily drift from one word to another. 

So write a single word on a piece of paper or mini-whiteboard or make a word with magnetic letters.

To get your child to focus on the word, either sit facing them, holding the word up in front of you as you point to each letter, or sit beside them and help them to point to each letter in turn. 

Now follow the simple 3-step procedure below:

    1. As you point to the first letter say its sound, pause, and then move on to the other letters saying each sound in turn with a short pause between each letter sound.


      It’s best to emphasise the first letter sound by saying it slightly louder than the others.  Also, remember to reduce the ‘uh’ after the consonant letters as much as possible as we discussed earlier.

    2. Now repeat this procedure for the same word again, but say the sounds a bit faster this time by shortening each pause.


    3. Then say the word normally as you run your finger quickly under the whole word from left to right.

So, for example, if the word was ‘bat’, you would point to each letter and say:

    1. b’—‘a’—‘t
      (Pausing between each letter sound and emphasising the first letter).
    2. b’-‘a’-‘t
      (Shorter pause between each letter sound, again emphasising the first letter).
    3. bat
      (Just saying the word normally as you run your finger quickly under the whole word from left to right).

The idea here is to demonstrate to your child that they need to identify and say the individual letter sounds* first and then combine them together to make a recognisable word. 

*Saying the individual sounds in a word is sometimes called ‘sounding out’ in phonics instruction.  Combining the sounds together to make a word is called ‘blending’.

Reducing the pause in the second step helps them to hear and grasp how the individual sounds merge together to make the word in step 3.

Next, get your child to repeat the 3-step procedure for the same word as you point to each letter again, or guide them to point to each letter. 

Adjust the speed of pointing between letters so that you point to the letters more quickly in step 2.  If your child doesn’t say the word in step 3 ask them what it is, or just say “spells?”  If they still don’t respond, just say the word again for them and ask them to repeat it.

Saying the letter sounds should be easy for a child who has completed stage 1 of the programme, but don’t be surprised if they can’t tell you what the word is in step 3.  If they can’t tell you, don’t make a big deal of it; just do it for them by repeating steps 2 and 3 yourself.  Then get them to repeat the word after you’ve said it. 

Once you’ve demonstrated the idea for 2 or 3 words, see if they can do a new word all by themselves.  If they struggle, just lead them through it and then move on to another new word.

You might find that after you’ve done the first 3-letter word they think that every other word you do spells the same thing.   This isn’t anything to worry about, just keep gently correcting them and they will eventually get the idea that different letters combine to make different words. 

Some Other Important Points...

  • The 3-step procedure described above is very much for absolute beginners.  As they get more familiar with the idea, children can blend words after sounding out each letter just once.  You can see blending demonstrated this way in the ‘Little Learners’ video below…

  • Eventually, they will be able to do the whole process automatically in their heads, perhaps only having to sound out very long or unfamiliar words.
  • Don’t do too much in one go, especially if you are teaching preschoolers.  As a guide, you might want to aim for sessions of around 10 minutes for very young children, but be prepared to stop a few minutes sooner, or go on for a few minutes longer, depending on your child’s age and focus at the time.

    It’s certainly better to stop while your child is still enthusiastic than to keep going until they get bored or irritable.

  • School-age children should be able to concentrate for significantly longer periods than toddlers.  Around 20-30 minutes a day would be a reasonable target for a child who has fallen behind with their reading and spelling.  Split the time up into 2 sessions if concentration is a problem.

  • You can choose to do a session every day, or every few days, but 3-5 times a week should be a minimum if you want your child to make good progress. In general, it’s better to space out sessions over the week than to cram them into one or two days.
  • At this very early stage, it’s helpful if your child has a good grasp of the meaning of a word before they attempt to read it. If it’s outside their vocabulary it will be much more difficult for them to understand what is going on.  Later, when your child has become reasonably proficient, it’s actually good for them to attempt reading a few words that they’ve never heard before.
  • Don’t repeat the same set of words too often or your child might start memorising the words rather than having to work them out from the letter sounds.  Although it’s good for reading fluency to remember some words, your child still needs plenty of practice at decoding new words.  Check out our CVC word lists for plenty of examples.


    Note that some common words have letters that don’t represent their usual sounds. 
    For example, in the word ‘was’, the letter ‘a’ sounds like an ‘o’ and the letter ‘s’ sounds like a ‘z’.  Other examples where some of the letters have irregular sounds include ‘has’, ‘his’, ‘do’, ‘to’, ‘go’, ‘so’, ‘he’, ‘we’ and ‘of’. 

    We think it’s best to deal with words like these after children have mastered the most common sounds.  At this early stage, learning tricky words like these could cause confusion. 

  • Keep reading to your child every day and look out for simple words in books they might be able to read for themselves. If they struggle to read a word, then help them to sound out and combine the letters.


    Don’t ask your child to guess words in books based on the pictures or context
    Contextual cues might work sometimes for simple picture books, but children can have problems later when they encounter harder books with more words and fewer pictures. 

  • Use some variety in your phonics instruction as this can help to keep kids attentive and improve motivation.  We’ve produced a number of free downloadable activities and games to improve phonics blending skills.  

And if you click on the following link or the images below you can access our free phonemic awareness blending games online page.  

In addition to these resources, we’ve compiled a variety of other ideas for blending games.

Click on the following link for further ideas if you have a child who is finding blending difficult.

Do Some Words Need to Be Learned By Sight?

Some educators recommend that so-called ‘high-frequency words’ should be taught early in a reading programme and learned as whole words.

These are sometimes referred to as sight words and children might be expected to memorise the shapes of the words rather than focus on the letters that make them up. 

We don’t think it’s necessary or helpful to teach high-frequency words in this way for reasons we discuss in separate articles on sight words and learning whole words

There are quite a few common words with irregular spellings that are more difficult to read using basic phonics knowledge.  These are described as ‘common exception words‘ in the English National Curriculum in the UK and we discuss how to deal with them in Stage 4 of this guide. 

Segmenting Simple Words

Children can be introduced to segmenting as soon as they’ve been taught how to blend a few written words.   

Many sites that describe the steps in phonics instruction miss out segmenting, but this skill is just as important as blending because it provides kids with a very important spelling strategy.  In fact, the two skills of blending and segmenting are the reverse processes of each other so learning one skill helps to reinforce the other.

We discuss how to teach segmenting in detail in our spelling with phonics article and you can use the following link to find a variety of segmenting activities and games.

Back to the summary of steps…

Stage 3: Blending and Segmenting Words with Simple Digraphs

With systematic phonics instruction, children are introduced to more complex words gradually. 

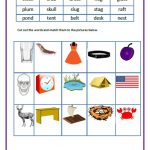
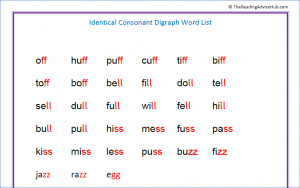
Once a child can read simple 2 and 3 letter words consistently, they can be introduced to words with pairs of identical consonants such as ‘puff’, ‘doll’, ‘mess’, ‘fizz’ and ‘egg’. 

Pairs of identical consonants are the simplest digraphs to learn because the letter-pairs usually represent the same sound as the individual letters. 

Children just need to be taught that 2 letters can sometimes stand for one sound

For example, with the word ‘huff’, explain to children that we would say:

/h/-/u/-/ff/, not /h/-/u/-/f/-/f/

This might seem obvious to an experienced reader, but it isn’t for someone who has just learned the basics of blending letter sounds to read words. 

We want to keep things as simple as possible when children are learning to read, so you don’t need to mention the term ‘consonants’ to your child at this stage (unless you know they are already familiar with the term). 

Stick with ‘letters’ and ‘sounds’ for now.  Introducing unnecessary new concepts at this point is more likely to confuse children than to help them.

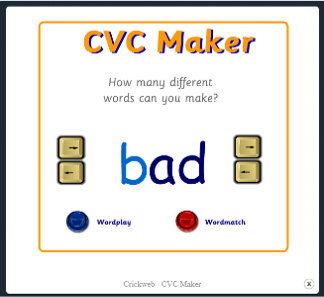
Model blending 2 or 3 example words such as ‘doll’, ‘kiss’ and ‘egg’, and then give your child some more words to blend for you.  

Tell them they only need to say the sound for the highlighted letters once – even though there are two letters.  

At this stage, stick to short one-syllable words like the examples above.  We’ve compiled a list of suitable words you can download for free.

Identical consonant digraph word list
Click on the image to view and download the pdf document.

The ‘ck’ digraph could also be introduced at this point because this letter pair also represents the same sound as the individual letters.  It can be illustrated using simple words such as duck, muck, peck and neck.

You can download more suitable examples by clicking on the image below…

Short words containing ck
Click on the image to download the word list.

Stage 4: Introduce Alternative Sounds for Letters and Common Exception Words.

Once children have learned to blend simple words, they soon notice that some of the words they meet in books don’t follow the basic alphabetic code they’ve been taught.

For example,  common words like  ‘the‘, ‘to‘, ‘said‘, ‘of‘ and ‘was‘ have spellings that aren’t consistent with the letter-sound correspondences that children have learned up to this point.

Some phonics programmes describe examples like these as irregular words, tricky words or common exception words

In order to read irregular words, children need to be gradually introduced to elements of the advanced alphabetic code.

You can start this process by telling children:  

“Letters can sometimes stand for more than one sound.” 

Explain that a letter might stand for one sound in one word but a different sound in another word, and give them some examples.

It’s best to start with simple examples where only one letter has an alternative sound. 

For instance, at this stage, children will be familiar with the sound represented by the letter s in words such as ‘sit’ and ‘hiss‘.   

You could show them the words as, has, is and his and explain that in these words the letter s represents the sound normally signified by the letter z.

It can help to show groups of words with similar spelling patterns like the ones above.   You can point out or highlight the irregular part of the words as we have done.

Other simple irregular words with common spelling patterns include:

      • he, we, me, be
      • so, no, go
      • do, to, into

You don’t need to introduce a lot of examples in one go.  Some phonics programmes focus on a couple of irregular words each week while continuing with other stages of the programme. 

The process of introducing alternative sounds for letters is something that will continue through each of the subsequent stages in the programme.

We provide more information about teaching tricky/common exception words in another article.  In the same article, we provide examples of common exceptions words that are introduced in school phonics programmes along with captions and activities for teaching these words.

You can also point out a few of these words as you encounter them in texts you are reading with your children.  

You might also find it useful to read our articles about the shwa sound and teaching the schwa sound.

Back to the summary of steps…

Stage 5: Blending and Segmenting More Complex Words

This stage introduces words that have adjacent consonants and words with 2 syllables.

Words With Adjacent Consonants

These are sometimes referred to as consonant clusters‘, consonant blends’, or just ‘blends.  However, the term adjacent consonants seems to be more popular in UK schools these days.  

In stage 3, we met words with adjacent consonant digraphs that represent just one sound (for example: off and pull and duck).  In this stage, the words have adjacent consonants that represent separate sounds.  

The word ‘swim’ is an example in this group of words because it starts with 2 consonants next to each other: ‘s’ and ‘w’, and we have to say both letter sounds and combine (or blend) them together to make ‘sw’. 

Similarly, the word ‘frog’ starts with the consonants ‘fr’ and the word ‘belt’ ends with the consonants ‘lt’. 

Some words have more than one set of adjacent consonants, such as ‘crust’, ‘trunk’, ‘frost’ and ‘drank’.

Many children can tackle these words without any problem; however, others can find reading words with adjacent consonants difficult at first, so be patient.

The following strategy can help to get the idea across…

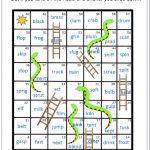
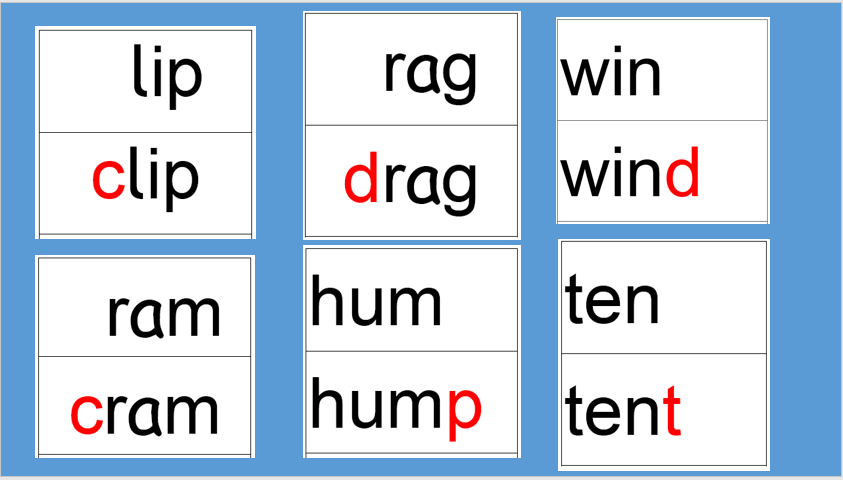
In the image below, you can see we’ve arranged some words in pairs.  The idea is to make it easier for children to see how adjacent consonant/blend words are built up from simpler words. 

Strategy for words with adjacent consonant

Start by getting your child to read a simple word that doesn’t contain any adjacent consonants.

Next, you will show them the same word, but with an extra consonant at the start of it.  Since they’ve already worked out the first word, they just have to add one more sound at the start to work out the new word.

For example, to help your child to read the word ‘clip’, you will first get them to read ‘lip’ as a separate word and then add a ‘c’ in front of it to get ‘clip’.

This can be done using printed words like the ones above, or with magnetic letters or alphabet cards. 

The advantage of magnetic letters or alphabet cards is that you can add or remove the extra letter as many times as you want.  Even if you don’t introduce the words with alphabet cards it’s still worth using these to help your child with spelling the words. 

You can also use this strategy for words with adjacent consonants at the end.  For the word ‘hump’, we start with ‘hum’ and then add the ‘p’ to make hump, and so on. 

Get your child to say the sound of each letter and then help them to combine the sounds into the word using the same 3-step procedure we outlined in stage 2.  If they struggle when you add the extra letter, just say the word for them without any pressure and get them to repeat it.

This strategy doesn’t suit all blend words.  For instance, to make the words ‘frog‘ and ‘swim‘ you would have to start with ‘rog‘ and ‘wim‘, which aren’t real words.

It can be hard to think of suitable examples on the spot for this strategy, so we’ve produced some free lists for you.

Click on the following link to download a list of suitable words that start with adjacent consonants.

Click on the following link to download a list of suitable words that end with adjacent consonants.

Educators sometimes use abbreviations like CCVC, CVCC, VCC, CCCVC, CCVCC, and CCCVCC to represent different categories of these words.  We’ve provided examples of each type and free downloadable lists for each of them in our article on adjacent consonant clusters/blends.

Remember that children should practise spelling these words as well as reading them.  

Words With More Than One Syllable…  

Reading these words doesn’t really require any new knowledge, but it does require a reasonable level of fluency as the words are generally a bit longer than the ones they’ve met up to this point.

It makes sense to start with 2-syllable words as these are usually the shortest and it also helps if children have some knowledge of what syllables are and have an awareness of syllable stress. 

We discuss some of the nuances of blending 2-syllable words in our article on blending.

Children need lots of practice to develop fluency and this requires plenty of suitable examples.

You can download our free list of 2-syllable words to help with this.

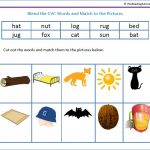
As children progress and meet new types of words in a phonics programme, it’s vitally important to keep the instruction relevant and meaningful.  So continue reading books with your children every day and look out for new words they can read for themselves in books as their skill level increases. 

You can also get children to read simple captions such as “a black dog” or “ducks in a pond”. 

If you decide to include pictures with captions, it’s better if you only show them after your child has successfully read the words.  If you show a picture with a caption, your child is more likely to just guess rather than read the words.

We provide examples of captions and other activities in our article on high-frequency and common exception words.

Back to the summary of steps…

Stage 6: Further Digraphs and Trigraphs.

It’s generally recognised that it’s harder to learn to read in English than it is for most other languages. 

We discuss the reasons for this in some detail in another article you can access from the above link.  However, one of the main problems is that there are more sounds in spoken English than there are letters in the alphabet. 

To get around this problem, we use groups of letters to represent some sounds. 

For example, when ‘s’ and ‘h’ are paired together in words like shop, or fish we say a sound that’s rather like the sound we make when we want someone to be quiet: ‘sh’. 

We don’t vocalise the individual letter sounds, the two letters represent one sound

Similarly, if we read words like ‘out’, or ‘cloud’ we say a sound that’s similar to the one we might make if we were to drop something on our toe; ‘o’ and ‘u’ are not sounded out individually. 

There are many other examples like these, where groups of letters team up to make a new sound. 

Some of them are 3-letter combinations, like ‘igh’ in high and light, which sounds like the letter name for ‘i’. 

Phonics instructors often use the terms ‘digraphs’ and ‘trigraphs’ for these letter combinations, but we think ‘letter teams’ is a more child-friendly phrase. 

Note that these letter teams are quite different from the adjacent consonants/consonant blends we met earlier. 

With consonant blends, such as the ‘fr’ in frog, each letter still represents a separate sound and they don’t need to be recognised as a special letter pairing. 

In contrast, digraphs represent single sounds that are often different from the individual letters that make them up.  And they do need to be recognised in order to read words containing them properly. 

Some sources on the internet don’t seem to understand this difference.

Here are some other examples of digraphs/letter teams children need to learn:

    • When ‘c’ and ‘h’ team up together the most common sound they represent is the one you would find in words like ‘chips’, ‘chat’ or ‘lunch’.
    • The ‘ai’ letter team is found in a variety of words such as ‘rain’, mail and ‘tail’.
    • The ‘ee’ letter team sounds the same as the name for the letter ‘e’. Examples of words include feet, peek and tree.
    • The ‘oa’ letter team is found in many common words such as coat, soap and toast; it sounds like the letter name for ‘o’.
    • The ‘oi’ letter team is found in words such as coin, point and soil.
    • The ‘or’ sound is found in words such as corn, fork and torn.
    • The ‘ph’ letter team is an alternative way of representing the ‘f’ sound and it appears in quite a few common words that children are familiar with, such as ‘elephant’ and ‘dolphin’.

Children need to practise plenty of examples of words containing each of these digraphs before they will recognise them automatically.  And, unfortunately, they will also have to learn a number of other letter teams that represent some of the same sounds.  

Some digraphs are ‘split’ either side of a consonant. 

This is easier to understand by looking at example words where the letter teams have been highlighted:

gate, Pete, kite, bone and June

Notice that in each case there is an ‘e’ after the consonant.  Since this modifies the sound of the vowel (by making it sound like its letter name) it’s sometimes called ‘magic e’.

To complicate things even more, some digraphs with the same spelling can represent 2 alternative sounds: 

    • For example, the ‘ow’ letter team represents a common sound in snow, blow, crow, flow and throw, but quite a different sound in many other common words such as cow, now, town, clown, and brown.
    • And the ‘oo’ letter team in zoo and hoop has a different sound in foot and wood.

There are other digraphs that we haven’t mentioned in this article to avoid making it too long.  We’ve compiled some comprehensive lists of digraphs in our main article on this topic.

Another thing to be aware of is that a lot of words contain more than one digraph.  For example:

mixed letter-teams

You need to be careful that you introduce words like these in the right order or they could confuse your children.

For many people, the thought of ploughing through all these digraphs and trigraphs with a child can seem daunting.  If it all seems like a lot of work to you, you’re right, it is. 

But it is doable if it’s approached in the right way, and it’s far more efficient and effective than trying to memorise thousands of words by rote.

A good phonics programme can make the whole process a lot less overwhelming by introducing new digraphs in a structured and logical sequence. 

To make things easier, we’ve included examples of teaching sequences from popular phonics programmes in our article about teaching digraphs.  We’ve also provided a suggested teaching sequence for digraphs and trigraphs of our own.

Back to the summary of steps…

What Else Do I Need to Do?

Although phonics is a very important part of learning to read, it’s also vital that you help your child to develop a love of books, a good vocabulary and a broad range of general knowledge. 

See our articles ‘Reading Comprehension Basics’ and ‘How Can I Improve My Child’s Vocabulary?’ for more information about these things.

Remember that it’s also really helpful to teach spelling alongside reading in a phonics programme.  See our article about spelling with phonics for more information about this.

You might also find our article about handwriting useful.

Further Resources:

Another way to access free resources and activities is to register with some of the specialist reading programmes that offer free trials.

For example:

Parents and teachers can register for a 30-day free trial with Reading Eggs.  This allows you to access over 500 highly interactive games and fun animations for developing Phonemic awareness, Phonics, Fluency, Vocabulary and Comprehension. 

Learn to Read! For ages 2-13

A 30-day free trial is also available from ABCmouse.com.  This is a leading online educational website for children ages 2–8. With more than 9,000 interactive learning activities that teach reading, math, science, art, music, and more.

Get 30 Days FREE of ABCmouse.com!

Although it’s not quite free, you can get a 30-day trial with the award-winning Hooked on Phonics programme for just $1.

IXL Learning cover 8000 skills in 5 subjects including phonics and reading comprehension.  You can click on the following link to access a 7-day free trial if you live in the US.

If you live outside of the US you can get 20% off a month’s subscription if you click on the ad. below:

Pin It on Pinterest